TABLE OF CONTENTS
1.3��
How to Obtain the ImageHunt
3.4��
ImageHunt Parameter Files
3.6��
Maintaining the ImageHunt: Parameters
3.7��
Maintaining the ImageHunt: Images
3.8��
Maintaining the ImageHunt: User Data
4. Attrasoft ImageFinder Level I Service
8. Finding Duplicated Document Images
9.1��
Why Wheel Rim Identification?
11.1��
Finding Duplicated Documents
12.��
Customize Web Form for ImageHunt
12.2��
Introduction to Web Server
12.4��
Step 1. Open Image File
12.4.1��
Create the Data Directory
12.4.2��
Modify the Default.aspx Page
12.6��
Step 3. Create Batch File
About Attrasoft ImageHunt
The ImageHunt matches
images on a web site.
The Attrasoft ImageHunt is the Internet version of the
ImageFinder. ImageHunt is the ImageFinder for Windows with a web
interface. If you need the ImageFinder for Windows, you might need the ImageFinder
for Web at some point.
The Internet Image Search Engine, by definition, does not bother users
with complicated parameters; therefore, all the parameters in the ImageHunt
must be fixed. The cost for such convenience is that each ImageHunt is
limited to a particular type of application, i.e. the ImageHunt will
require customization for a particular problem, say logos, auto parts,
documents, �.
The ImageHunt package consists of:
- ImageFinder for
Windows: the software required to develop your image matching application;
- ImageFinder Level I
Service: the professional service to set up your application;
�
ImageHunt software: the
software to be placed on the web server; and
- One-year technical support.
Software Requirements
The software requirements are:
- Microsoft .Net
Framework
- IIS (Internet
Information Services)
- Configuring IIS
Application
- Security Setting
CD Contents
D:\ImageHunt70\
This folder contains the
ImageHunt software.
D:\ImageHunt70\Default.aspx
����������� This is the ImageHunt
starting page.
D:\ImageFinder70\
This folder contains a copy
of the ImageFinder for development.
D:\Samples\
D:\Samples\Documents\
D:\Samples\Autoparts\
D:\Samples\FaceRecognition\
D:\Samples\Documents1to1\
D:\Samples\Autoparts1to1\
D:\Samples\Facerecognition1to1\
These folders contain the
three image-matching examples software.
D:\ImageHunt1to1\
This folder contains the
ImageHunt 1:1 matching software.
Installing ImageHunt
To install the ImageHunt:
- IIS Folder or Virtual Folder
�
Upload
CD:\ImageHunt70\ to
http://your_domain.com/imagehunt70/;��� OR
�
If
you have access to the sever directly, copy CD:\ImageHunt70\ to
C:\InetPub\wwwroot\ImageHunt70\;�������
OR
�
Create
a virtual folder in IIS, C:\your_path\ImageHunt70\ so you have a virtual folder
http://your_domain.com/imagehunt70/.
- Make ImageHunt an IIS Application
- Click Start\ Setting\ Control Panel\
Administrative Tools\ Internet Service Manager;
- Right click the ImageHunt70 folder and select Property;
- Go to Directory Tab;
- Click the Create Application button to create
an application;
- Go to Documents Tab, enable default document:
Default.aspx.
- Click OK.
- Web Sharing
�
Make
sure the ImageHunt70 folder is web shared: in the Windows Explorer, right click
the folder and select Property, go to Web Sharing Tab, and share this folder.
4.
IIS
and Windows Explorer Security
�
Folder,
ImageHunt70, needs �Read� right and �Run Scripts� right.
�
Folder,
ImageHunt70/imagefinder/data, needs �Read/Write� rights.
�
Folder,
ImageHunt70/data, needs �Read/Write� rights.
�
Folder,
ImageHunt70/library, needs �Read� right.
5.
ASPNET
process right
�
ASPNET
need right to write to ImageHunt70/imagefinder/data/abm70.txt. For example,
make ASPNET user a member of the Administrator group (ASPNET will not be a
member until you restart the computer).
Configuring the ImageHunt
Before the ImageHunt can be used, you must configure the ImageHunt:
- Upload or copy your library images
The Internet users will retrieve matched images from this folder:
http://your_domain.com/ImageHunt70/library/.
�
- Edit �http://your_domain.com\imagehunt70\imagefinder\data\link70.txt� file. Link70.txt controls the output page and it looks like this:
http://your_domain.com/ImageHunt70/library/
http://your_domain.com/ImageHunt70/library/
Input Image:
http://your_domain.com/ImageHunt70/data/
Search Again >
http://your_domain.com/imagehunt70/Default.aspx
Home >
http://your_domain.com/
Replace your_domain.com with your web address.
Information & Support
Attrasoft
P. O. Box 13051
Savannah, GA. 31406
USA
imagefinder@attrasoft.com (Email Subject: Attrasoft)
Phone:�
(912) 484-1717
�
Attrasoft 2005 - 2007
License Agreement
THIS LICENSE AGREEMENT ("AGREEMENT") IS BETWEEN YOU, THE END USER, AND Attrasoft. IT GOVERNS THE USE OF THE SOFTWARE PROGRAM AND DOCUMENTATION KNOWN AS Attrasoft ImageHunt (THE "PRODUCT"). IF YOU USE THE PRODUCT, THEN YOU AGREE TO THE TERMS OF THIS AGREEMENT. IF YOU ARE NOT WILLING TO BE BOUND BY THE TERMS OF THIS AGREEMENT, PROMPTLY RETURN THIS PACKAGE TO THE PLACE OF PURCHASE WITH A COPY OF THE RECEIPT, AND YOUR LICENSE FEE WILL BE REFUNDED.
Attrasoft licenses use of the PRODUCT, which may be manufactured and distributed by Attrasoft or by a third party (either, the "Manufacturer"). You, the end-user, assume responsibility for the selection of the PRODUCT to achieve your intended results, and for its installation and subsequent use.
GRANT OF LICENSE
Attrasoft
hereby grants you a non-exclusive license to use the PRODUCT in object code
form only, upon the terms and conditions contained in this Agreement.
You
may:
1.
Use the PRODUCT on the number of workstations for which you have purchased
PRODUCT licenses. The workstations must be owned, leased or otherwise
controlled by you, whether in a network or other configuration.
2.
Create a quantity of backup copies of the PRODUCT, in any machine-readable or
printed form, equal to the number of PRODUCT licenses you have purchased.
3.
Transfer the PRODUCT and your rights under this Agreement to another party if
the other party agrees to accept the terms and conditions of this Agreement. If
you transfer the PRODUCT, you must, at the same time, either transfer all
copies of PRODUCT to the same party, or destroy any copies not transferred. You
must immediately notify Attrasoft of the transfer.
4.
Print out one copy of the Product documentation from the Attrasoft program, ImageHunt, for each license purchased. If you print out
any part of the Product documentation from the Attrasoft program, ImageHunt, you must reproduce and include all the
copyright notices that appear in the documentation on any such copy of the
documentation.
You
May Not:
1.
Use or copy the PRODUCT, in whole or in part, except as expressly provided in
this Agreement.
2.
Use the PRODUCT concurrently on more than the number of workstations for which
you have purchased licenses.
3.
Copy, rent, distribute, sell, license or sub-license, or otherwise transfer the
PRODUCT or this license, in whole or in part, to another party, except as
specifically set forth above.
4.
Incorporate the PRODUCT or any portion of the PRODUCT into, or use the PRODUCT,
or any portion of the PRODUCT to develop, other software without a license from
Attrasoft, or otherwise modify or create a derivative work from the PRODUCT
without a license from Attrasoft.
5.
Reverse engineer, decompile, or disassemble the PRODUCT.
To
use the PRODUCT as described in Sections 2 or 4 above, or for any other use not
specifically set forth above, additional licensing from Attrasoft is required.
For further information, please contact Attrasoft at:
Attrasoft,
Inc.�����
Phone:
(912) 484-1717
gina@attrasoft.com
PROPRIETARY RIGHTS
This
Agreement gives you ownership only of the physical Attrasoft program, ImageHunt, on which the PRODUCT is stored, but not of
the PRODUCT itself. You acknowledge that Attrasoft owns all rights, title, and
interest in the PRODUCT, and that you will acquire no rights in the PRODUCT
through your use of it. You agree that you will take no action that interferes
with Attrasoft's rights in the PRODUCT.
TERMS
This
Agreement is effective until terminated. You may terminate it at any time by
destroying the PRODUCT together with all copies and documentation in any form.
This Agreement will also terminate automatically and without notice from
Attrasoft if you fail to comply with any term or condition of this Agreement.
You agree upon such termination to destroy the PRODUCT and all copies of the
PRODUCT.
DISCLAIMER; LIMITED WARRANTY
EXCEPT
AS PROVIDED BELOW, THE PRODUCT IS PROVIDED "AS IS" WITHOUT WARRANTY
OF ANY KIND, EITHER EXPRESSED OR IMPLIED, INCLUDING, BUT NOT LIMITED TO THE
IMPLIED WARRANTIES OF MERCHANTABILITY AND FITNESS FOR A PARTICULAR PURPOSE. THE
ENTIRE RISK AS TO THE QUALITY AND PERFORMANCE OF THE PRODUCT IS WITH YOU. SOME
JURISDICTIONS DO NOT ALLOW THE EXCLUSION OF IMPLIED WARRANTIES, SO THE ABOVE
EXCLUSION MAY NOT APPLY TO YOU. NEITHER ATTRASOFT NOR MANUFACTURER WARRANTS
THAT THE FUNCTIONS CONTAINED IN THE PRODUCT WILL MEET YOUR REQUIREMENTS OR THAT
THE OPERATION OF THE PRODUCT WILL BE UNINTERRUPTED OR ERROR-FREE. However,
where Attrasoft is the Manufacturer, Attrasoft warrants that the Attrasoft
program, ImageHunt, on which the software is furnished will be
free from defects in materials and workmanship under normal use for a period of
ninety (90) days from the date of delivery as evidenced by a copy of your
receipt.
LIMITATION OF REMEDIES
Where
Attrasoft is the Manufacturer, Manufacturer�s entire liability and your
exclusive remedy shall be:
1.
The replacement of the Attrasoft program, ImageHunt, not meeting the Limited Warranty, which is
returned to Manufacturer with a copy of your receipt.
2. If
Manufacturer is unable to deliver replacement Attrasoft program, ImageHunt, which is free of defects in materials or
workmanship, you may terminate this Agreement by returning the PRODUCT and a
copy of your receipt to the place of purchase, and your money will be refunded.
Where Attrasoft is not the Manufacturer, Attrasoft shall have no liability to
replace or refund, and you agree to look to Manufacturer to meet the
obligations described above.
LIMITATION OF LIABILITY
IN NO
EVENT WILL ATTRASOFT OR MANUFACTURER BE LIABLE TO YOU FOR ANY DAMAGES,
INCLUDING, BUT NOT LIMITED TO, ANY LOST PROFITS, LOST SAVINGS, OR OTHER
INDIRECT, SPECIAL, EXEMPLARY, INCIDENTAL OR CONSEQUENTIAL DAMAGES, ARISING OUT
OF THE USE OR INABILITY TO USE THIS PRODUCT, EVEN IF ATTRASOFT OR MANUFACTURER
HAS BEEN ADVISED OF THE POSSIBILITY OF SUCH DAMAGES. FURTHER, IN NO EVENT WILL
ATTRASOFT OR MANUFACTURER
BE LIABLE FOR ANY CLAIM BY ANY OTHER PARTY
ARISING OUT OF YOUR USE OF THE PRODUCT. SOME JURISDICTIONS DO NOT ALLOW THE
LIMITATION OR EXCLUSION OF LIABILITY FOR INCIDENTAL OR CONSEQUENTIAL DAMAGES,
SO THE ABOVE LIMITATION OR EXCLUSION MAY NOT APPLY TO YOU.
TRADEMARKS
Attrasoft is a trademark of Attrasoft, Inc. Microsoft,
C# logos are registered trademarks of Microsoft Corporation. No rights, license,
or interest in such trademarks is granted hereunder.
U.S. GOVERNMENT RESTRICTED RIGHTS IN DATA
This
computer software product and documentation are provided with Restricted
Rights. Use, duplication, or disclosure by the U.S. Government is subject to restrictions
as set forth in the Rights in Technical Data and Computer Software clause at
DFARS 252.227-7013, or subparagraphs (c)(1) and (2) of the Commercial Computer
Software - Restricted Rights at 48 CFR 52.227-19, as applicable.
Contractor/Manufacturer is Attrasoft, Inc.
EXPORT CONTROLS
You
agree not to export or re-export the PRODUCT, directly or indirectly, to any
countries, end-users or for any end uses that are restricted by U.S. export
laws and regulations, without first obtaining permission to do so as required
by the U.S. Department of Commerce's Bureau of Industry and Security, or other
appropriate government agency. These restrictions change from time to time. If
you have any questions regarding your obligations under U.S. export
regulations, you should contact the Bureau of Industry and Security, U.S.
Department of Commerce, Exporter
Counseling
Division, Washington D.C. (202) 482-4811, http://www.bis.doc.gov.
� Attrasoft 1998 � 2007
1.�� Introduction ImageHunt?

Figure 1.1�� ImageHunt 7.0.
1.1�� What is ImageHunt
The ImageHunt matches images on a web site.
The ImageHunt is the Internet version of the ImageFinder. ImageHunt is the ImageFinder for Windows with a web interface. If you need the ImageFinder for Windows, you might need the ImageFinder for Web at some point.
The Internet Image Search Engine, by definition, does not bother users with complicated parameters; therefore, all the parameters in the ImageHunt must be fixed. The cost for such convenience is that each ImageHunt is limited to a particular type of application, i.e. the ImageHunt will require customization for a particular problem, say logos, auto parts, documents, �.
Before
continuing, please make sure you are familiar with the Attrasoft ImageFinder.
1.2�� Software Requirements
To
run the ImageHunt, you must have:
- Microsoft .Net Framework
- IIS (Internet Information Services)
- Configuring IIS Application
- Assigning Rights
1.3�� How to Obtain the ImageHunt
You can either order a customized version of the ImageHunt from Attrasoft, or order the development tools to build the ImageHunt yourself.
I. If you order the ImageHunt from Attrasoft directly, the package includes:
- ImageFinder for Windows: the software required to develop your image matching application;
- ImageFinder Level I Service: the professional service to set up your application;
�
ImageHunt software: the software to be
placed on the web server; and
- One-year technical Support.
II. If you plan to build the ImageHunt yourself:
(1) Fix the ImageFinder parameters for your application;
(2) Write code for the ImageHunt via the Attrasoft TransApplet and the sample ImageHunt source code.�� Attrasoft TransApplet is a .Net Class library and the sample ImageHunt source code is in an example in the TransApplet.
(3) ImageHunt License and Support.
For more information on creating you own ImageHunt, please refer to the Attrasoft TransApplet User�s Guide.
1.4�� CD Contents
The CD has the following folders:
D:\ImageHunt70\
This folder contains the ImageHunt software.
D:\ImageHunt70\Default.aspx
����������� This is the ImageHunt starting page.
D:\ImageFinder70\
This folder contains a copy of the ImageFinder for development.
D:\Samples\
D:\Samples\Documents\
D:\Samples\Autoparts\
D:\Samples\FaceRecognition\
D:\Samples\Documents1to1\
D:\Samples\Autoparts1to1\
D:\Samples\Facerecognition1to1\
These folders contain the three image-matching examples software.
D:\ImageHunt1on1\
This folder contains the ImageHunt 1:1 matching software.
2.�� Users� Guide
The ImageHunt will make an image search in three clicks:
� User selects an image;
- User uploads the image;
- User clicks the Search button:
- ImageHunt creates a batch file;
o ImageHunt runs the batch file;
- ImageHunt sends the results back to users.
A user will do:
(1) Start the ImageHunt (Figure 2.1).
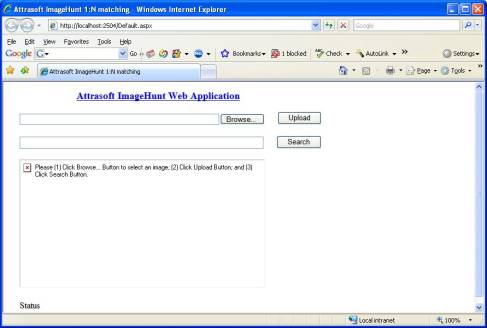
Figure 2.1� The ImageHunt.
(2) Click Browse button to select an image (Figure 2.2).
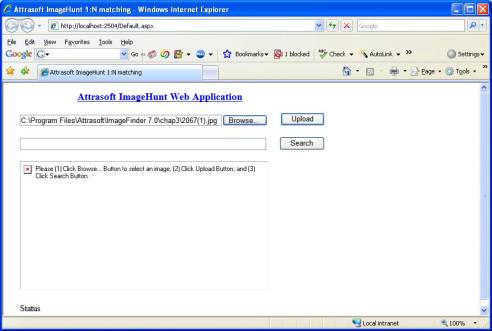
Figure 2.2�� Select an image.
(3) Click Upload button to upload the image (Figure 2.3).
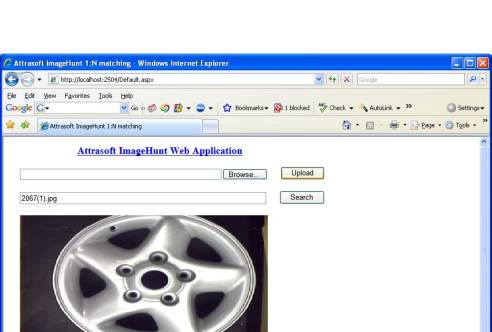
Figure 2.3�� Upload image.
(4) Click Search button to search (Figure 2.4).
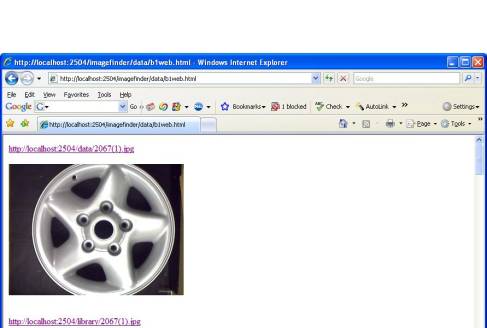
Figure 2.4�� Display the results.
3.�� Web Administrator
3.1�� Software Requirement
To
run the ImageHunt, you must have:
- Microsoft .Net Framework
- IIS (Internet Information Services)
- Configuring IIS Application
- Assigning Rights
Web applications require a server and a client. The client requests a page from the server and the server returns the page to the client, where the page is displayed inside the Internet Explorer.
To install the ImageHunt, you must have a server. The ImageHunt requires Microsoft IIS (Internet Information Services) and the Internet Explorer.
3.2�� Install ImageHunt
To install the ImageHunt:
1. IIS Folder or Virtual Folder.
� Upload CD:\ImageHunt70\ to
http://your_domain.com/imagehunt70/;��� OR
� If you have access to the sever directly, copy CD:\ImageHunt70\ to C:\InetPub\wwwroot\ImageHunt70\;������� OR
� Create a virtual folder in IIS, C:\your_path\ImageHunt70\ so you have a virtual folder http://your_domain.com/imagehunt70/.
- Make ImageHunt an IIS Application
- Click Start\ Setting\ Control Panel\ Administrative Tools\ Internet Service Manager;
- Right click ImageHunt70 folder and select Property;
- Go to Directory Tab;
- Click the Create Application button to create an application;
- Go to Documents Tab, enable default document: Default.aspx.
- Click OK.
- Web Sharing
� Make sure the ImageHunt70 folder is web shared: in the Windows Explorer, right click the folder and select Property, go to Web Sharing Tab, and share this folder.
4. IIS and Windows Explorer Security.
� Folder, ImageHunt70, needs �Read� right and �Run Scripts� right.
� Folder, ImageHunt70/imagefinder/data, needs �Read/Write� rights.
� Folder, ImageHunt70/data, needs �Read/Write� rights.
� Folder, ImageHunt70/library, needs �Read� right.
5. ASPNET process right
� ASPNET need right to write to ImageHunt70/imagefinder/data/abm70.txt. For example, make ASPNET user a member of the Administrator group (ASPNET will not be a member until you restart the computer).
At this point, you have installed the ImageHunt with the original applications. The next step is to replace the original application with your own application.
�
3.3�� ImageHunt Folders
The ImageHunt folders are:
CD:\imagehunt70\
����������� Default.aspx
����������� Data\
����������� Imagefinder\
����������� Imagefinder\data\
����������� Library\
Bin\
Where:
� �Default.aspx� is the starting web page;
� �data\� is the upload folder where users will upload their images;
� �imagefinder\data\� is the ImageFinder folder which will contain batch files and output files used by the ImageHunt;
� �library\� is the cashed library image folder; and
� �bin\� is the ImageHunt executable file folder.
To set up the ImageHunt for your application, you must replace two folders:
\imagehunt70\
����������� Imagefinder\data\
����������� Library\
The �Imagefinder\data\� contains parameters for your applications and the �Library\� folder contains your own images.
The ImageFinder Level I Service is included in the ImageHunt package. This service includes one complete set up: Attrasoft will prepare this folder, �imagefinder\data\�. All you have to do is simply upload this folder to replace the old folder.
3.4�� ImageHunt Parameter Files
�The folder,� �imagefinder\data\�, contains the parameters for your application. If you order the ImageHunt from Attrasoft, Attrasoft will do this step for you. If you develop the ImageHunt yourself, you will need to complete this step (See the Next chapter).
Before you can use the ImageHunt for your own application, you will need to do two things:
- Set up the ImageFinder parameter files, �.\imagefinder\data\master.txt�, �.\imagefinder\data\abm70.txt�,� �;
- Configure the ImageHunt output file, �.\imagefinder\data\link70.txt�.
The ImageHunt is basically the ImageFinder running in the batch mode plus a web interface; therefore, you must produce all of the necessary files used in the ImageFinder batch mode:
Abm70.txt, bf70.txt, nf70.txt, tp70.txt.
In each run, a new abm70.txt is generated from �master.txt�. Each time a user runs the ImageHunt, a new file, abm70.txt, is generated from the master.txt; therefore, you must have the right to write to file �.\imagefinder\data\abm70.txt�.
3.5�� ImageHunt Output
Before the ImageHunt can be used, you must also set up the output files by editing a file, �.\imagefinder\data\link70.txt�. Link70.txt looks like this:
http://your_domain.com/ImageHunt70/library/
http://your_domain.com/ImageHunt70/library/
Input Image:
http://your_domain.com/ImageHunt70/data/
Search Again >
http://your_domain.com/imagehunt70/Default.aspx
Home >
http://your_domain.com/
Replace your_domain.com with your web address.
The format is:
Library Image Label
Library Image Path
Key Image Label
Key Image Path
Search Again Label
Search Again Path
Home Label
Home Path
In order for the Internet user to view these images, the ImageHunt must replace the local path with the Internet address. This is the role of link70.txt, which has 8 lines divided into 4 pairs of (label, link):
- The first pair defines the library images;
- The second pair defines the incoming image;
- The third pair defines �Search Again�; and
- The fourth pair defines the home web address.
3.6�� Maintaining the ImageHunt: Parameters
The ImageHunt is updated via the folder, imagefinder/data/. The ImageFinder files are in:
http://your_domain.com/imagehunt70/Imagefinder/data/
where the
�imagefinder\data\� folder contains all of the parameters and files required
for the ImageHunt.
If you need to update, simply replace this folder. The next chapter will show you how to generate this folder after the initial Attrasoft service.
3.7�� Maintaining the ImageHunt: Images
The images displayed to your users are in:
http://your_domain.com/imagehunt70/Library/
If you need to update your images, just upload them there.
3.8�� Maintaining the ImageHunt: User Data
Each time a user runs the ImageHunt, he/she will upload an image to:
http://your_domain.com/imagehunt70/data/
Periodically, you should move these images elsewhere and empty this folder.
4. Attrasoft ImageFinder Level I Service
To set up the ImageHunt for your application, you must replace two folders:
\Imagehunt70\
����������� ImageFinder\data\
����������� Library\
The �ImageFinder\data\� contains parameters for your applications and the �Library\� folder contains your own images.
The ImageFinder Level I Service is included in the ImageHunt package. This service includes one complete set up: Attrasoft will prepare this folder, �imagefinder\data\�, for you. All you have to do is simply upload this folder to replace the old folder.
However, this service covers only one set up. If you want to continuously update the ImageHunt, you will have the option of obtaining new services from Attrasoft or do it yourself.
This chapter explains how you will do it yourself.
4.1�� ImageHunt Procedure
Before you can use the ImageHunt, you must replace two folders:
\ imagehunt70\
����������� Imagefinder\data\
����������� Library\
The procedure is:
- Set up the ImageFinder files for your application;
- Save your application setting;
- Create a master file for your application;
- Configure ImageHunt, link70.txt;
- Upload the folder, �.\ Imagefinder\data\�.
We assume you are familiar with the ImageFinder before you deploy the ImageHunt. You will develop your image recognition application with the ImageFinder, which includes tweaking the parameters required for your application.
The image recognition development is implemented via the ImageFinder. After you have completed developing your application, you will need to save your setting by clicking �Batch/Save 1� menu item; then upload the saved files to the ImageHunt.
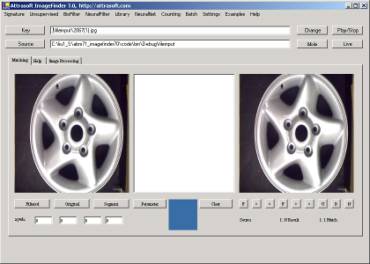
Figure 4.1�� ImageFinder.

Figure 4.2�� Save the ImageFinder Setting.
The ImageHunt looks for the parameters from a file called master.txt, now you will need to create this file.
Now you will upload files for your web image recognition application, which includes data files and images.
Finally, you will adjust the file, link70.txt, and upload it also.
4.2�� Details
Step 1: Develop
Your Web Application
The first thing you will do is to develop your image recognition application with the ImageFinder, which includes tweaking the parameters required for your application and collecting images. For more information on developing an image recognition application, see the three examples in the later chapters.
You will also get the professional help from Attrasoft.
Step 2: Save ImageFinder Batch Files
After you have completed developing your application, you will need to save your setting by clicking �Batch/Save 1� menu item. This will create several new files specific to your application, including:
����������� .\data\Abm70.txt
����������� .\data\ bf70.txt
����������� .\data\ nf70.txt
����������� .\data\ tp70.txt
�where �.� is the folder where the ImageFinder is stored. The default folder is:
����������� C:\Program Files\Attrasoft\ImageFinder 7.0\data\
However, it is also convenient to create one folder for each image recognition application. A copy of the ImageFinder is located on CD:
����������� D:\ImageFinder70\.
Step 3: Create
Master.txt
In the �.\data� folder, where �.� is the folder where the ImageFinder is stored, copy abm70.txt to master.txt. Master.txt will be used to create abm70.txt file for each run.
Step 4: Link70.txt.
You will need to adjust the link70.txt files if necessary. For the format of the file, see the last chapter.
Step 5: Upload
Now you will upload
the folder �.\data� folder, where �.� is the folder where the ImageFinder is
stored.
5.�� Common Errors
Common errors are:
�The ImageHunt will not run�
There are several possibilities for this error:
1. You must make ImageHunt an IIS (Internet Information Service) Application
� Click Start\ Setting\ Control Panel\ Administrative Tools\ Internet Service Manager;
� Right click the ImageHunt70 folder and select Property;
� Click the Create Application button to create an application;
� Click OK.
2. You must assign the following rights:
� Folder, ImageHunt70, needs �Read� right and �Run Scripts� right.
� Folder, ImageHunt70/imagefinder/data, needs �Read/Write� rights.
� Folder, ImageHunt70/data, needs �Read/Write� rights.
� Folder, ImageHunt70/library, needs �Read� right.
3. Web Shared Folder
� Make sure the ImageHunt70 folder is web shared (Right click the folder and select Property).
4. ASPNNT
ASPNET runs the *.aspx files. This process (program in execution) must have the right to write files:
����������� �.\imagefinder\data\abm70.txt�.
Each computation will create a file:
http://your_domain.com/imagehunt70/imagefinder/data/abm70.txt.
The ImageHunt must have the proper rights to create this file.
Link70.txt
If
you click a link on the output web page and cannot see images, it is likely
that link70.txt is not configured correctly.
ImageHunt not
updated
The ImageHunt creates abm70.txt from master.txt. After you update your ImageFinder, copy abm70.txt to master.txt and upload it to:
http://your_domain.com/imagehunt70/imagefinder/data/master.txt.
ImageHunt Runs, But No Results
Make sure you make 1:N matching in the ImageFinder and save the Batch file. Make sure you copy abm70.txt to master.txt. Make sure the Execution Code in master.txt is 3001.
6.� To Do List
6.1�� Initial Work
1. Upload CD:\ImageHunt70
http://your_domain.com/imagehunt70/;
Please maintain the file structure:
\ imagehunt70\
����������������������� Default.aspx
����������������������� Data\
����������������������� Imagefinder\
����������������������� Library\
Bin\
- Make the ImageHunt folder, http://your_domain.com/imagehunt70/, an IIS Application.
The web-hosting administrator should:
- Click Start\ Setting\ Control Panel \ Administrative Tools\ Internet Service Manager;
- Right click ImageHunt70 folder and select Property;
- Click the Create Application button to create an application;
- Click OK.
3.�� Assigning Rights:
� Folder, ImageHunt70, needs �Read� right and �Run Scripts� right.
� Folder, ImageHunt70/imagefinder/data, needs �Read/Write� rights.
� Folder, ImageHunt70/data, needs �Read/Write� rights.
� Folder, ImageHunt70/library, needs �Read� right.
4. Web shared Folder
� Make sure the ImageHunt70 folder is web shared (Right click the folder and select Property).
5. ASPNNT
ASPNET runs the *.aspx files. This process (program in execution) must have the right to write files:
����� http://your_domain.com/imagehunt70/imagefinder/data/abm70.txt.
- Upload Image Data
������ Upload your images into:
http://your_domain.com/imagehunt70/Library/
- Modify link70.txt
Edit �http://your_domain.com\imagehunt70\imagefinder\data\link70.txt� file.
Link70.txt looks like this:
http://your_domain.com/ImageHunt70/library/
http://your_domain.com/ImageHunt70/library/
Input Image:
http://your_domain.com/ImageHunt70/data/
Search Again >
http://your_domain.com/imagehunt70/Default.aspx
Home >
http://your_domain.com/
��� ����Replace �your_domain.com� with your web address.
�
6.2�� Update
The ImageFinder files are in:
http://your_domain.com/imagehunt70/imagefinder/data/
To update the ImageHunt, you will need to replace this folder. For details, see the last chapter.
6.3�� Routine Maintenance
Periodically, you should move images in the following folder elsewhere and empty this folder.
http://your_domain.com/imagehunt70/data/.
7.�� 1:1 Matching
The ImageHunt 1:1 Matching will make a 1:1 Matching in four clicks:
� User selects first image;
� User selects second image;
- User uploads the image;
- User clicks the Match button:
- ImageHunt creates a batch file;
o ImageHunt runs the batch file;
- ImageHunt sends the results back to users.
A user will:
(1) Start the ImageHunt (Figure 7.1).
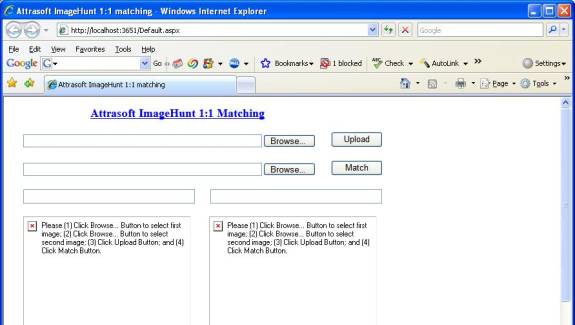
Figure 7.1� The ImageHunt.
(2) Click two Browse buttons to select two images (Figure 7.2).

Figure 7.2�� Select two images.
(3) Click the Upload the button to upload the image (Figure 3).
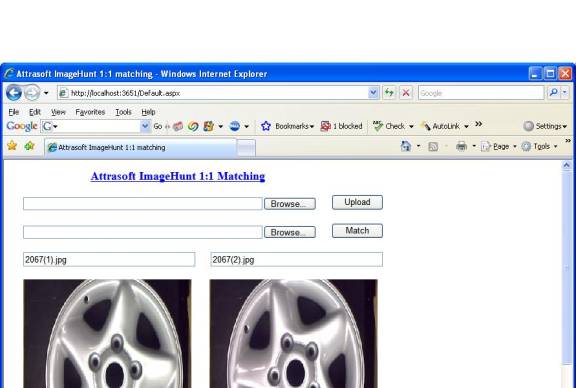
Figure 7.3�� Upload image.
(4) Click the Search button to search (Figure 4).
Figure 7.4�� Display the results.
The format for link70.txt is:
Key Image Label
Key Image Path
Key Image Label
Key Image Path
Search Again Label
Search Again Path
Home Label
Home Path
8. Finding Duplicated Document Images
This section attempts to solve a particular problem: to retrieve duplicated Document images. Recent development in scanner technology has made it very easy to convert paper documents into digital documents. The scanner creates image names via auto-numbers you have specified. Some scanners can scan and save 1,000 pages in a single click. Assume you have a million pages of documents already converted into digital form, and you want to add more document images to your collection; however, you do not want to add the duplicated documents.
Start from the ImageFinder, click menu item �Example/Special Example/Document Duplication�; then click �Batch/Run�, this completes the Document Duplication project.
This chapter starts from the beginning; we will set up an online web site for finding duplicated documents. Now, we will first briefly walk through the Document duplication example.
The software is stored at:
����������� D:\samples\Documents\
In the rest of chapter, �.\� folder means this folder. Note that you cannot run the ImageFinder in the CD because it will create files. You can upload this folder to:
����������� http://your_domain.com/samples/Documents/.
8.1�� Why Image Matching?
Image matching deals with several particular problems, which cannot be addressed by text search, 1D barcode search, or 2D barcode search:
(1) Tables: image matching is responsible for retrieving documents with similar Tables.
Figure
8.1 Documents with Tables.
(2) Images: image matching is responsible for retrieving documents with similar images.
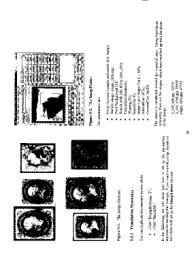
Figure 8.2 Documents with images.
(3) Special Symbols: image matching is responsible for retrieving documents with similar Special Symbols.

Figure
8.3 Documents with Special Symbols.
(4) Figures, Drawing, Designs: image matching is responsible for retrieving documents with similar Figures, Drawing, and Designs.
 ��
��
(5) Maps: image matching is responsible for retrieving documents with similar Maps.
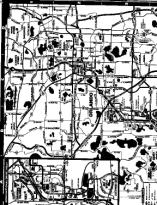
Figure
8.5 Documents with maps.
�(6) Hand Written Notes: image matching is responsible for retrieving documents with Hand Written Notes.
� 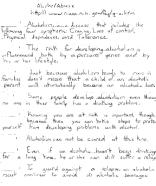
Figure 8.6�� Documents with handwritten notes.
(7) �
8.2�� Data
The data inside the ImageFinder is located in the following folder:
Name�� ��� ������� Location���������������������������������� # of Images�����
Misc���� ��� ������� .\sp_document\misc\����������������� 93 x 2�� = 186
BioAPI������������ .\sp_document \bioapi\�������������� 119 x 3 = 357
Abm54������������ .\sp_document \abm54\������������� 160 x 3 = 480
Total���������������������������������������������������������������� 1,023 images
The �Misc� example has 93 matching pairs, or 186 images. It has various types of documents such as Tables, Images, Music, Figures, Drawings, Designs, Maps, �
The �BioAPI� example has 119 matching triplets, or 357 images. BioAPI is a document, which attempts to set up a standard for the biometric templates. This document has 119 pages.
The �Abm54� example has 160 triplets, or 480 images.
Positive Match
� The �Misc� example has 93 matching pairs, or 186 images; there are 186*2 positive matches.
� The �BioAPI� example has 119 triplets, or 357 images; there are 357*3 positive matches.
� The �Abm54� example has 160 triplets, or 480 images; there are 480*3 positive matches.
� In the file, �.\data\b1_matchlist_ex_doc.txt�, which is the summation of all positive matches, there are 186*2� + 357*3 + 480*3 = 2883 positive matches.
8.3�� Parameters
The
NeuralFilter Matching will be used to retrieve duplicated Documents; there are
five steps:
�
Parameters
�
Signatures
�
Training
- Matching
- Analysis
The ImageFinder has many parameters. Changing these parameters will change the output of the computations. The Parameters are set by clicking the Parameter button in the ImageFinder, which will open the Parameter Window in Figure 8.8. You will adjust the ImageFinder parameters here.
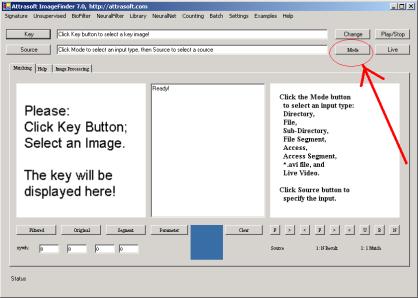
Figure
8.7� Set the Input Mode as �Sub
Dir�, Sub-directory Input. Click the Mode button until you see �Sub Dir�.
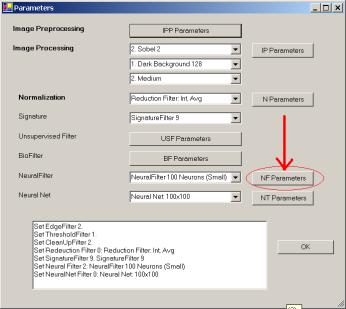
Figure 8.8� Parameters for the Neural Filter.
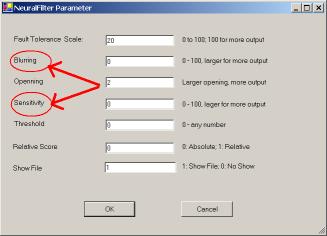
Figure 8.9� Neural Filter parameters, Blurring, & Sensitivity.
We will set several parameters in this chapter:
- Signature Filter =� �Signature Filter 9� (See Figure 8.8)
- Input Mode = �Sub Dir� (See Figure 8.7)
- Blurring = 0 (See Figure 8.8, 8.9)
- Sensitivity = 0 (See Figure 8.8, 8.9)
Setting:
- The Signature Filter will be set to �Signature Filter 9� (See Figure 8.1).
- The input mode will be the sub-directory input, i.e. the ImageFinder will find the signature from all sub-folders of a specified folder. Click the Mode button until you see �Sub Dir� in Figure 8.7.
- Click the Neural Filter parameter button in Figure 8.8; you will get Figure 8.9. Set both Blurring and Sensitivity to 0 in Figure 8.9.
8.4�� Signature
To compute the N-signatures:
- Click the �Mode� button until you see �Sub Dir�;
- Click the �Source� button to select directory, �.\sp_document\�; then select any file in this folder;
- Click �Signature/N Signature (a1.txt)� to compute the signatures in a1.txt.
8.5�� Training
Training requires two files:
Match.txt
� Open the file, �.\data\match_ex_doc.txt�. This file lists 930 matching pairs. Save it to match.txt (overwrite the existing file). Now the training file is prepared.
T1.txt:
- In the last step, we have obtained a1.txt;
- Click menu item �Signature/Copy a1.txt to t1.txt� to get the training file, t1.txt.
Training
� Click �NeuralFilter\Training\Training� to train the Neural Filter.
8.6�� Matching
N: N Matching compares each image, a1.txt, with every image in the a1.txt:
- Click menu item �NeuralFilter/Matching/N:N (a1.txt vs. a1.txt)� button to complete a N:N Match.
The result will go to a file, b1.txt, which will be opened right after the click. The file will look like this:
C:\...\sp_document\abm54\abm54_a_0001.jpg
C:\...\sp_document\abm54\abm54_a_0001.jpg
242307
C:\...\sp_document\abm54\abm54_a_0157.jpg
103862
C:\...\sp_document\abm54\abm54_b_0001.jpg
119753
C:\...\sp_document\abm54\abm54_b_0152.jpg
107823
C:\...\sp_document\abm54\abm54_c_0001.jpg
123101
�
Total Number of Matches = 13277
8.7�� Analysis
Possible
Matches
Let the Total Images in the input file be N, the Possible Matches will be N*N. In our example, N * N = 1023 x 1023 = 1,046,529.
Attrasoft
Matches
The number of retrieved matches is listed in the last line of b1.txt. Go to the end of� b1.txt, you will see something like this:
Total Number of Matches = 13277
Actual Match
This number depends on
your problem. It should be the first number in b1_matchlist.txt. In our
example, it is 2883.
Attrasoft Found
Duplicates
To check the results, we must prepare the
b1_matchlist.txt file now. This file is already prepared for you and we will
simply open it and save it to b1_matchlist.txt (overwrite the existing file).
The steps are:
� Open �./data/b1_matchlist_ex_doc.txt. Save it to b1_matchlist.txt (overwrite the existing file). Now this file is prepared.
� Click �NeuralFilter/Check(b1_matchlist.txt required)� to check the results of the BioFilter.
The result is:
Total Matches = 2883
All of the pairs are identified. Now that you have all of the numbers, you can make an analysis.
Positive
Identification Rate
In this
example, the Positive Identification Rate is 100%, �i.e., 2883/2883 = 100%.
Elimination Rate
Elimination Rate = 98.7 % = (1 � 13277/1,046,529).
Hit Ratio
The Hit Ratio = 2883/13277 = 21.8 %.
��
Composite
Index
The composite index is = 100% * 98.7% * 21.8% = 21.5%.
8.9�� ImageHunt Set Up
Assume:
(1) You have created the Document duplication project in the default place:
����������� c:\program files\Attrasoft\ImageFinder 7.0\data\.
(2) Your upload folder is:
����������� http://your_domain.com/samples/Documents/.
You will:
(1) Make 1:N match and save the setting by Batch/Save, which generates abm70.txt. The execution Code in abm70.txt should be 3001. Save .\Imagefinder\data\abm70.txt to .\Imagefinder\data\master.txt.
(2) Upload the ImageHunt 7.0
����������� Upload the folder D:\ImageHunt70\
To
����������� http://your_domain.com/samples/Documents/.
(3) Replace the parameter folder
����������� http://your_domain.com/samples/Documents/ImageFinder/data/��
by
����������� c:\program files\Attrasoft\ImageFinder 7.0\data\.
(4) Replace the image folder
����������� �http://your_domain.com/samples/Documents/library
by
����������� D:/samples/Documents/library.
(5) Edit link70.txt.
9.�� Wheel Rim Identification
In the ImageFinder 7.0, click menu item �Example/Special Example/Wheel Recognition�; then click �Batch/Run�, the ImageFinder portion of this project is done. Now, we will walk through the Wheel Rim Identification example from the beginning.
Auto Parts consist of products like wheel rims, doors, bumpers, converters, ... There are more than 70,000 wheel rim designs, more than 200 bumpers, ... In any given month, about 1,500 types of wheel rims are used. It is hard for a human eye to identify each wheel rim, bumper, and other car parts.
This chapter attempts to solve a particular problem: given a wheel rim, identify what it is.
The software is stored at:
����������� D:\samples\Autoparts\
In the rest of chapter, �.\� folder means this folder. Note that you cannot run ImageFinder in the CD because it will create files. You can upload this folder to:
����������� http://your_domain.com/samples/Autoparts/.
9.1�� Why Wheel Rim Identification?
Given a wheel rim, what is its identification number? This has broad applications, from simply ordering a damaged part, to placing the wheel rim in the right place on a shelf.�
9.2�� Data
The data is located in the following folder:
Name�� ��� ������� Location���������������������������������� # of Images�����
Quadraplet������� .\sp_wheel\������������������������������ 25 x 4 = 100
Doublet . ��������� .\sp_wheel\������������������������������ 60 x 2 = 120
Singlet������������� . \sp_wheel\����������������������������� 44 x 1 = 44
Total���������������������������������������������������������������� 264 images
There are 25 �Quadruplet� images: 60 pairs, and 44 singlets in this data set. The �Quadruplet � set has 25 quadruplets, or 100 images; there are 100*4 positive matches. The �Doublet� set has 60 doublets, or 120 images; there are 120*2 positive matches. There are 100*4� + 120*2 + 44 x 1= 681 positive matches in total.
9.3�� Parameters
The NeuralFilter Matching will be used for the Wheel Rim Identification project; there are five steps:
�
Parameters
�
Signatures
�
Training
- Matching
- Analysis
The ImageFinder has many parameters. Changing these parameters will change the output of the computations. Clicking the Parameter button, which will open the Parameter Window in Figure 9.1, sets the Parameters. You will adjust the ImageFinder parameters here.
We will set several parameters in this chapter:
- Signature Filter =� �Signature Filter 9� (See Figure 9.1)
- Preprocessing Filter/Skip Empty Border = 6 (See Figure 9.2)
- Preprocessing Filter/Skip Percent = 5 (See Figure 9.2)
- Preprocessing Filter/Skip Threshold Filter = 1 (See Figure 9.2)
- Preprocessing Filter/Skip Edge Filter = 2 (See Figure 9.2)
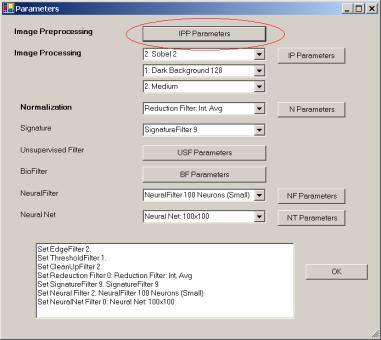
Figure 9.1� IPP (Image Pre-Processing) Filter parameters.
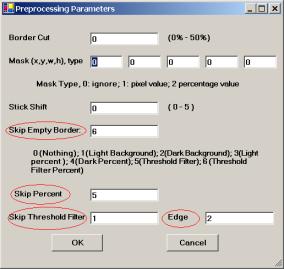
Figure 9.2� Preprocessing Filter parameters. Set Preprocessing Filter/Skip Empty Border = 6, Preprocessing Filter/Skip Percent = 5, Preprocessing Filter/Skip Threshold Filter = 1, Preprocessing Filter/Skip Edge Filter = 2.
Setting:
- The Signature Filter will be set to �Signature Filter 9� (See Figure 9.1).
� Click the IPP (Image Pre-Processing) Parameter button in Figure 9.1; you will get Figure 9.2. Set the parameters.
9.4�� Signature
To compute the N-signatures:
- Click the �Source� button to select directory, �.\sp_wheel\�; then select any file in this folder;
- Click �Signature/N Signature (a1.txt)� to compute the signatures in a1.txt.
9.5�� Training
Training requires two files:
Match.txt
�
Open the file,
�.\data\match_ex_wheel.txt�. This file lists 420 matching pairs, 300 from the
quadruplets and 120 doublets. Save it to match.txt (overwrite the existing
file). Now the training file is prepared.
T1.txt:
- In the last step, we obtained a1.txt;
- Click menu item �Signature/Copy a1.txt to t1.txt� to get the training file, t1.txt.
Training
�
Click
�NeuralFilter\Training\Training� to train the Neural Filter.
9.6�� Matching
N:
N Matching compares each image, a1.txt, with every image in the a1.txt:
- Click menu item �NeuralFilter/Matching/N:N (a1.txt vs. a1.txt)� button to complete a N:N Match.
The results will go to a file, b1.txt, which will be opened right after the click. The file will look like this:
C:\...\sp_wheel\1056a.JPG
C:\...\sp_wheel\1056a.JPG
242307
C:\...\sp_wheel\1056b.JPG
83106
C:\...\sp_wheel\1056b.JPG
C:\...\sp_wheel\1056a.JPG
83106
C:\...\sp_wheel\1056b.JPG
242307
�
Total Number of Matches = 754.
9.7�� Analysis
Possible
Matches
Let the Total Images in the input file be N, the Possible Matches will be N*N. In our example, N * N = 264 x 264 = 69,696.
Attrasoft
Matches
The number of retrieved matches is listed in the last line of b1.txt. Go to the end of� b1.txt, you will see something like this:
Total Number of Matches = 754.
Actual
Match
This number depends on
your problem. It should be the first number in b1_matchlist.txt. In our
example, it is 100*4� + 120*2 +
44 x 1= 681.
Attrasoft
Found Duplicates
To check the results, we must prepare the
b1_matchlist.txt file now. This file is already prepared for you and we will
simply open it and save it to b1_matchlist.txt (overwrite the existing file).
The steps are:
� Open �./data/b1_matchlist_ex_wheel.txt. Save it to b1_matchlist.txt (overwrite the existing file). Now this file is prepared.
� Click �NeuralFilter/Check(b1_matchlist.txt required)� to check the results of the BioFilter.
The result is:
Total Matches = 640 (quadruplet and doublet) +
41 (singlet)
All of the matching images are identified. Now that you have all of the numbers, you can make an analysis.
Positive
Identification Rate
In this example, the Positive Identification Rate is 100%,
�i.e., 681/681 = 100%.
Elimination
Rate
Elimination Rate = 99 % = (1 � 754/69,696).
Hit
Ratio
The Hit Ratio = 681/754 = 90 %.
��
Composite
Index
The composite index is = 100% * 99% * 90% = 89%.
9.8�� ImageHunt Set Up
Assume:
(1) You have create the Wheel Rim Identification project in the default place:
����������� c:\program files\Attrasoft\ImageFinder 7.0\data\.
(2) Your upload folder is:
����������� http://your_domain.com/samples/Autoparts/.
You will:
(1) Make 1:N match and save the setting by Batch/Save, which generates abm70.txt. The execution Code in abm70.txt should be 3001. Save .\Imagefinder\data\abm70.txt to .\Imagefinder\data\master.txt.
(2) Upload the ImageHunt 7.0
����������� Upload the folder D:\ImageHunt70\
To
����������� http://your_domain.com/samples/Autoparts/.
(3) Replace the parameter folder
����������� http://your_domain.com/samples/Documents/ImageFinder/data/��
by
����������� c:\program files\Attrasoft\ImageFinder 7.0\data\.
(4) Replace the image folder
����������� �http://your_domain.com/samples/Autoparts/library
by
����������� D:/samples/Autoparts/library.
(5) Edit link70.txt.
10.�� Face Recognition
Click menu item �Example/Special Example/Face recognition�; then click �Batch/Run�, and the ImageFinder portion of this chapter is done. Now, we will walk through the Face Recognition example from the beginning.
This chapter attempts to solve a particular problem: to scan a document (passport, ID card, �) with a Face Photo ID and match this face image against an existing database. Assume you have millions of Photo ID�s already converted into images, and you want to make a 1:N Matching with the newly captured image.�
The software is stored at:
����������� D:\samples\Facerecognition\
In the rest of chapter, �.\� folder means this folder. Note that you cannot run ImageFinder in the CD because it will create files. You can upload this folder to:
����������� http://your_domain.com/samples/FaceRecognition/.
10.1�� Data
There are 516 pairs of face images, or 1032 images. Each image will match itself and its partner; giving a total of 1032 * 2 = 2064 matches.
10.2�� Parameters
The NeuralFilter Matching will be used to match Face images; there are five steps:
�
Parameters
�
Signatures
�
Training
- Matching
- Analysis
The ImageFinder has many parameters. Changing these parameters will change the output of the computations. The Parameters are set by clicking the Parameter button, which will open the Parameter Window in Figure 10.1. You will adjust the ImageFinder parameters in the Parameter window.
We will set several parameters in this chapter:
- Signature Filter =� �Signature Filter 15� (See Figure 10.1)
- Blurring = 0 (See Figure 10.1, 10.2)
- Sensitivity = 0 (See Figure 10.1, 10.2)

Figure 10.1� Parameters for the Neural Filter.

Figure 10.2� Neural Filter parameters: Blurring, & Sensitivity.
Setting:
- The Signature Filter will be set to �Signature Filter 15� (See Figure 10.1).
- Set both Blurring and Sensitivity to 0 in Figure 10.2.
10.3�� Signature
To compute the N-signatures:
- Click the �Source� button to select directory, �.\sp_face\�, then select any file in this folder;
- Click �Signature/N Signature (a1.txt)� to compute the signatures in a1.txt.
10.4�� Training
Training requires two files:
Match.txt
� Open the file, �.\data\match_ex_face.txt�. This file lists 516 matching pairs. Save it to match.txt (overwrite the existing file). Now the training file is prepared.
T1.txt:
- In the last step, we obtained a1.txt;
- Click menu item �Signature/Copy a1.txt to t1.txt� to get the training file, t1.txt.
Training
�
Click
�NeuralFilter\Training\Training� to train the Neural Filter.
10.5�� Matching
N: N Matching
compares each image, a1.txt, with every image in the a1.txt:
- Click menu item �NeuralFilter/Matching/N:N (a1.txt vs. a1.txt)� button to complete a N:N Match.
The results will go to a file, b1.txt, which will be opened right after the click. The file will look like this:
C:\...\sp_face\00019ba010_960521.jpg
C:\...\sp_face\00019ba010_960521.jpg
345857
C:\...\sp_face\00019bj010_960521.jpg
147782
C:\...\sp_face\00802fb010_941205.jpg
124425
C:\...\sp_face\00019bj010_960521.jpg
C:\...\sp_face\00019ba010_960521.jpg
147782
C:\...\sp_face\00019bj010_960521.jpg
345857
�
Total Number of Matches = 6354.
10.6�� Analysis
Possible
Matches
Let the Total Images in the input file be N, the Possible Matches will be N*N. In our example, N * N = 1032 x 1032 = 1,065,024.
Attrasoft
Matches
The number of retrieved matches is listed in the last line of b1.txt. Go to the end of� b1.txt; you will see something like this:
Total Number of Matches = 6354.
Actual Match
This number depends on your problem. It should be the first number in b1_matchlist.txt. In our example, it is 2064.
Attrasoft Finds
Matches
To check the results, we must prepare the
b1_matchlist.txt file now. This file is already prepared for you and we will
simply open it and save it to b1_matchlist.txt (overwrite the existing file).
The steps are:
� Open �./data/b1_matchlist_ex_face.txt. Save it to b1_matchlist.txt (overwrite the existing file). Now this file is prepared.
� Click �NeuralFilter/Check(b1_matchlist.txt required)� to check the results of the BioFilter.
The result is:
Total Matches = 2064
All of the pairs are identified. Now that you have all of the numbers, you can make an analysis.
Positive
Identification Rate
In this
example, the Positive Identification Rate is 100%, �i.e., 2064/2064 = 100%.
Elimination Rate
Elimination Rate = 99.4 % = (1 � 6354/1,065,024).
Hit Ratio
The Hit Ratio = 2064/6354
= 32.5 %.
��
Composite
Index
The composite index is = 100% * 99.4% * 32.5% = 32.3%.
10.7�� ImageHunt Set Up
Assume:
(1) You have created the Face Recognition project in the default place:
����������� c:\program files\Attrasoft\ImageFinder 7.0\data\.
(2) Your upload folder is:
����������� http://your_domain.com/samples/FaceRecognition/.
You will:
(1) Make 1:N match and save the setting by Batch/Save, which generates abm70.txt. The execution Code in abm70.txt should be 3001. Save .\Imagefinder\data\abm70.txt to .\Imagefinder\data\master.txt.
(2) Upload the ImageHunt 7.0
����������� Upload the folder D:\ImageHunt70\
To
����������� http://your_domain.com/samples/FaceRecognition/.
(3) Replace the parameter folder
����������� http://your_domain.com/samples/FaceRecognition/ImafeInder/data/
by
����������� c:\program files\Attrasoft\ImageFinder 7.0\data\.
(4) Replace the image folder
����������� �http://your_domain.com/samples/FaceRecognitions/library
by
����������� D:/samples/FaceRecognitions/library.
(5) Edit
link70.txt.
11.�� 1:1 Matching Example
The ImageHunt 1:1 matching will make 1:1 Matching in four clicks:
� User selects first image;
� User selects second image;
- User uploads the image;
- User clicks the Match button:
- ImageHunt creates a batch file;
o ImageHunt runs the batch file;
- ImageHunt sends the results back to users.
11.1�� Finding Duplicated Documents
The software is stored at:
����������� D:\samples\Documents1to1\
You can upload this folder to:
����������� http://your_domain.com/samples/Documents1to1/.
A user will do:
(1) Start the ImageHunt 1:1 Matching.
(2) Click two Browse buttons to select two images.
(3) Click the Upload the button to upload the image.
(4) Click the Search button to search.
To install, you will:
(1) Upload the ImageHunt 1:1 Matching
����������� Upload the folder D:\ImageHunt1to1\
To
����������� http://your_domain.com/samples/Documents1to1/.
(2) Edit link70.txt.
The format for 1:1 Matching is:
Key Image Label
Key Image Path
Key Image Label
Key Image Path
Search Again Label
Search Again Path
Home Label
Home Path
11.2�� Auto Parts Matching
The software is stored at:
����������� D:\samples\Autoparts1to1\
You can upload this folder to:
����������� http://your_domain.com/samples/Autoparts1to1/.
11.3�� Face Recognition
The software is stored at:
����������� D:\samples\FaceRecognition1to1\
You can upload this folder to:
����������� http://your_domain.com/samples/FaceRecognition1to1/.
12.�� Customize Web Form for ImageHunt
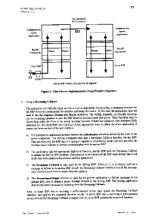
12.1�� ImageHunt Design
This chapter will show you how to program the ImageHunt. The basic idea is this:
� User selects an image;
- User uploads the image;
- ImageHunt creates a batch file based on the newly uploaded image;
� ImageHunt runs the batch file;
- ImageHunt sends the resulting html page back to users.
The main job is to tweak the parameters via the ImageFinder. After that, simply add a web interface to the Attrasoft.TransApplet70.Dos class to complete the ImageHunt.
12.2�� Introduction to Web Server
Web applications require a server and a client. The client requests a page from the server and the server returns the page to the client; the page is displayed inside the Internet Explorer.
To develop a web application, you must have a server. The ImageHunt requires Microsoft IIS (Internet Information Services) and the Internet Explorer. You should install IIS before you install C#.
Internet Browsers display pages written in http language, web page. The web pages are stateless, i.e. a page does not store any information about its contents from one page to the next. The equivalent to the Windows version of the ImageFinder is this: when you start the ImageFinder, you are only allowed 1 click; if you want to make another click, close the ImageFinder, restart, and then make your next click.
There are several ways to address this limitation, including the �Get� method and the �Post� method.
- The �Post� method stores cookies on the local machine. If you choose the �Post� method, you must inform your clients to accept cookies.
- The �Get� method sends state information back to the server via the web address.
Later in this chapter, you will need to choose one of the two methods.
12.3�� Create Web Project
Now we start to create an ImageHunt. To create a new C# ASP.NET Application project:
- Start the Visual Studio .Net.
- Click File � New Project command. The New Project dialog box is displayed.
- Highlight the Visual C# project folder in the Project Type list to display the templates that are available for C#. Then, highlight the ASP.NET Application template.
- Enter a name for the project and select the location for the project. A folder with the same name as the project is automatically added to the location you specify.
- Click the �OK� button to start the new project.
The implementation is fairly straightforward. The algorithm is:
Step 1. Open an image via the Internet Explorer.
Step 2. Upload the Image.
Step 3. Create a batch file on the server based on the submitted image.
Step 4. Run the batch file.
�����������
Step 5. Send the results back.
We will make the following assumption for simplicity: all library images are stored in a single folder.
12.4�� Step 1. Open Image File
12.4.1�� Create the Data Directory
After you create
the application, you create the Data directory that will accept uploaded files.
After you create this directory, you must also set write permission for the
ASPNET worker account.
To create a folder in your project, in the Solution Explorer of Visual Studio .NET, right-click the ASP.Net project, point to Add, and then click New Folder to create a folder,� �Data�.
12.4.2�� Modify the Default.aspx Page
To modify the HTML code of the Default.aspx file to permit users to upload files, add the File Upload control from the Toolbox. Alternatively, follow these steps:
1. In the WebForm1.aspx Designer window, right-click Default.aspx and select View HTML Source.
2. Locate the following HTML code, which contains the:
<form>
�
</form>
�����������������������������������������������������������
3. Replace it as follows:
<form id="Form1" method="post" enctype="multipart/form-data" runat="server">
<INPUT type=file id=File1 name=File1 runat="server" />
</form>
4. Run and test it.
This html code simply opens an Open File Dialog so Users can select a key image.
12.5�� Step 2. Upload Image
Add the following to the form so it will look like Figure 6.1:
- Upload button
- Search button
- TextBox
- Error message label
Double click the �Submit� button and enter:
private void Submit1_ServerClick(object sender, System.EventArgs e)
����������� {
����������� if( ( File1.PostedFile != null ) && ( File1.PostedFile.ContentLength > 0 ) )
����������������������� {
����������������������� string fn = System.IO.Path.GetFileName(File1.PostedFile.FileName);
����������������������� SaveLocation = Server.MapPath("Data") + "\\" +� fn;
�����������
����������� Session [ "theFileName" ] = SaveLocation;
����������������������� string displayLocation =� dataPath + "\\" +� fn;
����������������������� try
����������������������� {
����������������������������������� File1.PostedFile.SaveAs(SaveLocation);
����������������������������������� Label2.Text = "Upload file to: " + displayLocation;
����������������������������������� Image2.ImageUrl = displayLocation;
����������������������������������� TextBox2.Text =
System.IO.Path.GetFileName(File1.PostedFile.FileName);
����������������������� }
����������������������� catch ( Exception ex )
����������������������� {
����������������������������������� Label2.Text = "Error: " + ex.Message;
����������������������� }
����������������������� }
����������� else
����������������������� {
����������������������������������� Response.Write("Please select a file to upload.");
����������������������� }
����������� }
First of all, the following code makes sure a valid image has been selected:
if( ( File1.PostedFile != null ) && ( File1.PostedFile.ContentLength > 0 ) )
����������������������� {
����������������������� �
}
����������� else
����������������������� {
����������������������������������� Response.Write("Please select a file to upload.");
����������������������� }
The following code finds the image name from the client�s computer and creates the path for this image on the server:
string fn = System.IO.Path.GetFileName(File1.PostedFile.FileName);
����������������������� SaveLocation = Server.MapPath("Data") + "\\" +� fn;
�����������
The following code uploads the file:
����������������������� try
����������������������� {
����������������������������������� File1.PostedFile.SaveAs(SaveLocation);
����������������������� }
����������������������� catch ( Exception ex )
����������������������� {
����������������������������������� Label2.Text = "Error: " + ex.Message;
����������������������� }
12.6�� Step 3. Create Batch File
12.6.1�� Cookies or URL
The User will make three clicks:
- Select File;
- Upload File;
- Search.
The third click is the �Search� button, which will lead to a new web form. The code for the �Search� button is:
����������� private void Button1_Click(object sender, System.EventArgs e)
����������� {
����������� string fn = TextBox2.Text;
����������� SaveLocation = Server.MapPath("Data") + "\\" +� fn;
����������� Response.Redirect ("Attrasoft_ImageHunt2.aspx" + "?p="+ SaveLocation);
����������� }
The uploaded image is passed to the new web form, �Attrasoft_ImageHunt2.aspx�. You could choose cookies (Post Method):
Session [ "theFileName" ] = SaveLocation;
Or URL (Get Method):
����������� Response.Redirect ("Attrasoft_ImageHunt2.aspx" + "?p="+ SaveLocation);
Obviously, we have chosen the URL to pass the location of the uploaded image. If you choose the Cookies, you must inform your client to accept cookies.
12.6.2�� Create Batch File
At this point, we are redirected to web form, �Attrasoft_ImageHunt2.aspx�. Upon starting this web form, the following code will call function, �start()�:
private void Page_Load(object sender, System.EventArgs e)
����������������������� {
����������������������� start();
����������������������� }
The first thing �start()� will do is to create a batch file used by the ImageFinder for Dos:
string master = "master.txt";
����������� string parameterFile = "abm70.txt";
bool createFile ()
����������������������� {
����������������������� StreamWriter sw;
����������������������� StreamReader sr;
����������������������� string sRead;
����������������������� int i = 0;
����������������������� try
����������������������� {
����������������������������������� sr = new StreamReader ( matchLocation + master );
����������������������������������� sw = new StreamWriter ( matchLocation + parameterFile );
����������������������������������� i = 0;
����������������������������������� while ( sr.Peek () != -1 )
����������������������������������� {
����������������������������������� sRead = sr.ReadLine ();
����������������������������������� if ( i == 3 )
����������������������������������� {
����������������������������������� //sw.WriteLine ( "trainFileName=" + Session [ "theFileName" ] );
����������������������������������� sw.WriteLine
( "trainFileName=" +Request.QueryString ["p"].ToString () );
����������������������������������� }
����������������������������������� else
����������������������������������������������� sw.WriteLine (sRead);
����������������������������������������������� i++;
����������������������������������� }
����������������������������������� sw.Close ();
����������������������������������� sr.Close ();
����������������������������������� }
����������������������������������� catch ( Exception em )
����������������������������������� {
����������������������������������������������� Label1.Text =� em.ToString () +"\n";
����������������������������������������������� return false;
����������������������������������� }
����������������������������������� return true;
����������������������� }//create file
This function basically copies "master.txt� to "abm70.txt" line by line, with the exception of line 3:
if ( i == 3 )
����������������������������������� {
����������������������������������� //sw.WriteLine ( "trainFileName=" + Session [ "theFileName" ] );
����������������������������������� sw.WriteLine
( "trainFileName=" +Request.QueryString ["p"].ToString () );
����������������������������������� }
This is where the ImageHunt learns where the new image is. There are several other minor things; we will omit them here.
12.7�� Dos Class
We will briefly review the Dos70 library introduced in the last chapter. We will use the �Attrasoft.Transapplet70.Dos70� library; please read the last chapter to become familiar with this library.
The main class in this library will be:
����������� Attrasoft.TransApplet70.Dos70.Dos70.
The interface, which is implemented by Dos70, is:
����������� public interface I_Dos70
����������� {
����������� //Parameters
�string getFilePath ();
����������� � void setFilePath (string s);
�����������
����������� // Command
� ��������� ��bool save (int i);
����������� � bool open (int i );
����������� � bool load ();
����������� � bool run();
����������� � bool ImageFinderForDos (int i);
����������� }
To set the batch file, use:
�string getFilePath ();
����������� �void setFilePath (string s).
There is only one command:
����������� bool ImageFinderForDos (int x).
which is the same as:
bool open (int i );
����������� bool run();
The parameter, x, can have the following values: 1, 2, 3, 4, 5.
- Value 1 corresponds to the ImageFinder command: �Batch/Open� + �Batch/Run�;
- Value 2 corresponds to the ImageFinder command: �Batch/Open 2� + �Batch/Run�; ����
To include the class library in the project,
�
In the Solution
Explorer, right click References and select Add Reference;
- Browse to find �Dos70.dll� in �c:\transapplet70\�;
� Highlight it and click the �OK� button.
To declare an object, add:
Attrasoft.TransApplet70.Dos70.Dos70 d70
= new Attrasoft.TransApplet70.Dos70.Dos70 ();
12.8�� Step 4. Batch Run
Now the batch file is created, and we simply make a batch run:
void start()
����������������������� {
����������������������������������� matchLocation = Server.MapPath(filePath) + "\\" ;
����������������������������������� bool b = createFile ();
����������������������������������� if (!b)
����������������������������������� {
����������������������������������������������� Label1.Text = "Creating parameter file fails!" ;
����������������������������������������������� return ;
����������������������������������� }
����������������������������������� �
����������������������������������� d70 = new Attrasoft.TransApplet70.Dos70.Dos70 ();
����������������������������������� d70.setFilePath (matchLocation);
����������������������������������� d70.open (1);
����������������������������������� �
�����������������������������������
����������������������� 70.run ();
�����������
����������������������� � ��������� Response.Redirect ("imagefinder/b1.htm");
����������������������� }
The following code creates a batch file:
bool b = createFile ();
����������������������������������� if (!b)
����������������������������������� {
����������������������������������������������� Label1.Text = "Creating parameter file fails!" ;
����������������������������������������������� return ;
����������������������������������� }
The following code creates a Dos70 object:
d70 = new Attrasoft.TransApplet70.Dos70.Dos70 ();
The following code sets up the parameters:
d70.setFilePath (matchLocation);
����������� d70.open (1);
����������� �
The following code runs the batch file:
70.run ();
This statement will create an ImageFinder output file. The last step is to show the results:
Response.Redirect ("imagefinder/b1.htm").
�����������